Using Resource Manager
Before you start
Your system must be using the Alemba API. This is installed by default for all systems running versions higher than 9.7.
You must have View Resource Manager selected in the Workflow Management Security Role: Shared Tabtab of your Workflow Management security role.
You must be Allocating Resource Managers for the relevant workflow group(s) in the Workflow Management Groups window.
From the main menu, select View, and then Resource Manager.
The Resource Manager window consists of three panes:
- Resource Allocations Pane lists your resource managed teams and analysts, and a calendar view of all of the analysts' currently allocated tasks
- Unallocated Tasks Pane shows the resource managed tasks that have been allocated to your team(s) and are awaiting allocation
- Task Details Pane shows the details of the task currently selected in either the Unallocated Tasks or the Resource Allocations pane
Updates to information in any of the panes will be reflected in the other two.
Resource Allocations Pane
This pane lists your resource managed teams and analysts down the left hand side, and a calendar view of all of the analysts' currently allocated tasks.
The calendar view displays the current month by default, with the current day/time in the middle, and indicated by a vertical blue line. Saturdays and Sundays are grayed out (but can still be used).
In this version of Resource Manager, working hours and calendars are not in use. One week is considered to be 168 hours, and tasks can be allocated for all of those hours.
You can click on any column header to center this date/time in the display.
Resource Allocations Toolbar
You will see a number of buttons and controls at the top of the Resource Allocations pane.

They perform the following functions:
| Save | saves all of the changes to resource allocation | ||||||||||
| Refresh | cancels all of the changes made to task details or allocations since the last time you saved | ||||||||||
| Auto Scroll | Select to ensure that the optimum time frame for the task allocation is always displayed in the window when you start to allocate a task. You may choose to deselect this option and manually choose the date display if, say, you want to allocate tasks in a different timeframe. |
||||||||||
| Group by Team | Select to group the displayed analysts in their resource managed workflow groups. If an analyst is a member of several workflow groups, they will appear in each group. Their task allocations will be displayed in each entry. Deselect to display the analysts independent of their workflow groups. They will be displayed in alphabetical order. |
||||||||||
|
Skill Filter |
Select to show which analysts have the appropriate skill set to complete a selected task. See Allocating Tasks According to Skills for more details. |
||||||||||

|
|
||||||||||
| Month/Week/Day View | You can change the granularity of the calendar, choosing between Month, Week and Day.
|
||||||||||
| Today |
Select to return the display to show today's date, if the current date is not displayed. |
||||||||||

|
Use the left and right arrows to display the month/week/day before or after the current one, depending on the granularity of the display | ||||||||||
 (current date range) (current date range) |
Select to display a calendar drop down, from which you can choose a date (range) in the normal way |
Analysts
All teams for which you are identified as a Resource Manager are displayed, broken down by analyst. The Resource Managed tasks that are allocated to each of the analysts are also displayed.
Allocated Tasks
When the task is allocated, it is represented by a colored bar in the analyst's calendar row. You can view a summary of the task details by hovering over it, or click on it to see more details in the Task Details pane. You can also double click on it to open the Task Details window in a separate tab.
Allocation Key

|
The chosen analyst is over allocated This is represented by diagonal yellow lines, slanting down from left to right |

|
Tasks are allocated to an analyst without the required skill This is represented by diagonal gray lines, slanting up from left to right |

|
Tasks are out of sync This is represented by horizontal bright blue lines |

|
Tasks are outside the “task window” This is represented by vertical dark blue lines |

|
Tasks overlap OLA/SLA breach time This is represented by a grid of orange dots |
Hover over the Info icon in the top toolbar to see a key to the different pattern styles used in the calendar.
Unallocated Tasks Pane
The bottom pane in the window shows tasks that:
- have been Complete the Resource Management details, if appropriate. See Creating a Standard Task for more details. in the Task Details, either at workflow template level or within the specific request
- have been assigned or forwarded to the resource manager's team(s)
- have not been allocated to an analyst
- are not yet complete
It shows the following details, ordered by the task's Planned Start date. The information shown reflects details held on the Task Details window. Scroll across if all of the columns are not visible on your screen.
| Task | Task Number |
| Title | Task Title |
| From | Planned Start |
| To | Target Date |
|
Length |
Planned Time |
| Authorized | Status of the task. If this is not selected, the task may be suspended |
| Active | Active Task |
| Type | Task Type |
| Phase | Task Phase |
| Request | Request Number |
| Workflow | Request Screen Set |
You can manipulate the information that is displayed in the columns by clicking on the column headers and selecting from the drop down options. 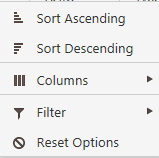
You can also group the details by the details in a particular column by dragging the column header to the space between the Unallocated Tasks heading, and the top of the browse table - 
This can be useful if you want to, say, group all of the tasks in the same request.
You can group by multiple columns, and sort the information within the groups by clicking the small arrows to the left of the name in the group tile - 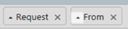
To cancel the grouping, just click the x in the tile.
Task Details Pane
When a task is selected in the Unallocated Tasks or Resource Allocations pane, the Task Details pane shows the task details.
The following information is shown:
| Task Details | The upper section contains the task details. You can use the scroll bar to the right of the section to scroll up and down if all of the details are not visible on your screen. |
| Request | Request Number and Description. Click on the request number to open the request in a new tab |
| Task | Task Number. Click on the number to open the task details in a new tab |
| Type | Task type |
| Authorized | Indicator whether the task is authorized |
| Active | Indicator whether the task is active |
| Window | Planned time for the task |
| From | Planned Start date/time |
| To | Target Date |
| Length | Planned time |
| Allocation | The lower section of the Task Details pane shows allocation information, as described below. |
| Team | The workflow group to whom the task is assigned |
| Work Start |
The date on which the analyst is expected to start the task. This field is completed by either dropping the task on the calendar in the Resource Allocations pane, using the calendar keys, or keying in a date/time. See Allocating Tasks in Resource Manager for more details. |
| Work End | The date/time when the task is expected to be complete. This is automatically completed based on the Work Start and Duration details and is read only. |
| Duration | The length of time that the task is expected to take. This is an editable field, and the details are updated in the Task Details window accordingly. |